Showing posts with label Appetizer. Show all posts

Tuesday, October 2, 2012

Cheese Sticks Two Ways

I had been seeing people making cheese sticks by wrapping string cheese in wonton wrappers for quite awhile. It took some time, but I finally got around to trying it. I'm so glad I did!!

I've seen them both ways, fried and baked. So I tried both!


Cheese Sticks
String Cheese
Wonton Wrappers
oil for frying (if you're frying!)
Dipping Sauces

Cut each string cheese into thirds.
Roll into wonton wrappers.

Now either fry in oil heated to 350F until golden.

Or...

Place on a parchment paper lined baking sheet, spritz with olive oil and sprinkle with salt and bake at 400F for 15 minutes or until golden.

Serve with your favorite dipping sauces.

~~~~~~~~~~~~~~~~~~~~~~~~~

First you need these...


Cut the string cheese sticks into thirds


Place a wonton wrapper on plate or cutting board in front of you as shown below.

Moisten the tip of your finger with water and trace around the edge of the wonton wrapper.

Place a piece of cheese near the bottom of the wonton wrapper.


Fold up the bottom of the wrapper over the cheese.


Fold in the sides.


Roll it up tight.


Repeat until you run out of cheese or wrappers or until you have as many as you'd like.


Now for baking, lay them out on a parchment paper lined baking sheet.

Spray them with oil olive. Then sprinkle with kosher salt. Or whatever salt you like!


Into the oven, preheated to 400F for 15 minutes. Turn them half way through.

But pay attention to them, they might leak a little.


Enjoy with your favorite dipping sauces!


Now if you're frying... heat your oil to 350F and fry a few at a time.

Be sure to not overcrowd the pan.


Drain on a paper towel


And serve with your favorite dipping sauces!


At first I was thinking that the baked ones would be really lame.

But both were really good!!

Fried of course is amazing, because everything is really good fried. They're crispy and melty and gooey. Totally delicious!

But the baked one were also wicked good. They're chewy and salty and creamy. So good!

The kids swarmed on these and devoured both kinds in a matter of minutes.

Try them both ways and see which way your family prefers!

Thursday, July 26, 2012

Amazing Shrimp Marinade

My friend, Erin & I had been dying for grilled shrimp for quite a while. Ericka was in town for the weekend, so I decided it was a perfect time to make it!

I kinda dawdled trying to find a recipe for the marinade. I had looked at a few that looked OK, but nothing looked really great.

So finally... being the procrasti-slacker that I am... the morning of dinner, I jumped online again to look for a marinade.

Not wanting to waste time, I went to allrecipes.com. I found a five star recipe with over 1600 reviews. Even with people reviewing... and changing ALL of the ingredients before they make it, I figured this had to be a good one... and let me tell ya, I was NOT disappointed!!

Photobucket

Marinated Grilled Shrimp
3 cloves garlic, minced
1/3 cup olive oil
1/4 cup tomato sauce
2 tablespoons red wine vinegar
2 tablespoons chopped fresh basil
1/2 teaspoon salt
1/4 teaspoon cayenne pepper (more or less to taste)
2 pounds fresh shrimp, peeled and deveined

In a large bowl, stir together the garlic, olive oil, tomato sauce, and red wine vinegar.
Season with basil, salt, and cayenne pepper.
Add shrimp to the bowl, and stir until evenly coated.
Cover, and refrigerate for 30 minutes to 1 hour, stirring once or twice.
Thread shrimp onto skewers, piercing once near the tail and once near the head.
Discard marinade.
Preheat grill for medium heat.
Lightly oil grill grate.
Cook shrimp on preheated grill for 2 to 3 minutes per side, or until opaque.

~~~~~~~~~~~~~~~~~~~~~~~~~~~~~~

So I doubled this recipe. I started with a 5 pound bag of frozen shrimp. (I left a pound in the freezer)

Since I procrasti-slacked, I had to thaw mine in the sink under cold water instead of in the fridge.
Photobucket

Then I set up my peel & clean station in the sink.

Colander filled with thawing shrimp. Empty colander for peeled, cleaned shrimp and a ziplock bag to collect the shells to make stock at a later date.
Photobucket

The shells & legs pull off easily, put them in the ziplock bag.

To devein the shrimp, just slice along the center back, pull out the vein and wash it down the drain.

Photobucket

Now I have a big bag of shrimp shells to make stock!
Photobucket

Just store them in the freezer.

And a big bowl of cleaned shrimps!
Photobucket

Whisk everything together... I added extra cayenne, because we like it spicy...
Photobucket
Photobucket

I put the shrimps and the marinade in a ziplock bag and into the fridge.
Photobucket
Photobucket

After about an hour I skewered them on wooden skewers that had been soaking in water for about an hour.

I put them in a glass baking dish for easy storage until I was ready to grill.
Photobucket

I also poured the leftover marinade over them, since it would still be a little while before I was ready for grilling.

Then onto a pre-heated grill.
Photobucket

Flip
Photobucket

And it's dinner time!
Photobucket

I spiced mine up a good bit, but they weren't too spicy.

These shrimps were a HUGE success. Everyone really really loved them. I can't say enough about how delectably delicious they were!

If you actually have leftovers, which I doubt you will... they'd be awesome on a salad or in a wrap.

Plus they were so easy!!

To BlondiePerez on allrecipes.com.... Well done!!

I'm going to be trying this marinade on chicken, beef and pork!

If you want to leave your dinner guests, ooooing and ahhhhing over your mad culinary skills... I highly recommend you try this!

Friday, July 6, 2012

Nectarine Mango Salsa

A long time ago I had some peach mango salsa and really liked it! I've been trying, without much success, to find some that I liked ever since... until now.

This is adapted from a recipe I found on Winner Dinners,, while browsing tastespotting.com.

This was wicked good!! It's a good thing too, because I had a good bit of drama while making it!!

Photobucket

Nectarine Mango Salsa
1-1/2 C fresh tomatoes, peeled and chopped
3 ripe nectarines, chopped
1 ripe mango, peeled and chopped
3/4 C red bell pepper, chopped
1 C onions, chopped
1/2 C cilantro, chopped
4 TBLS jalapeno pepper, seeded and chopped
3 cloves garlic, minced
1/4 cup tomato paste
1 TBLS apple cider vinegar
1 tsp lemon juice
2 TBLS sugar
1 tsp dried oregano
2 tsp salt
1/8 tsp pepper
tortilla chips

Peel the tomatoes by dropping them into boiling water for about a minute and then running them under cold water. The peels should come off easily.
Chop the tomatoes and place in a medium-sized bowl.
Chop the nectarines and mango and add to the bowl.
Chop the red bell pepper, onions, and cilantro and add to the bowl.
Chop the jalapeno and mince the garlic and add to the bowl.
In a separate small bowl, combine the tomato paste with the apple cider vinegar, lemon juice, sugar, oregano, salt, and pepper.
Stir well and then add to the larger bowl.
Mix again and serve with tortilla chips.

~~~~~~~~~~~~~~~~~~~~~~~

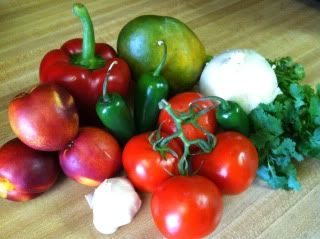
This is what you need... well.. the produce anyway...
Photobucket

Next peel the tomatoes.

I had never done this before... it's so easy!

Boil a pot of water... drop in the tomatoes...
Photobucket

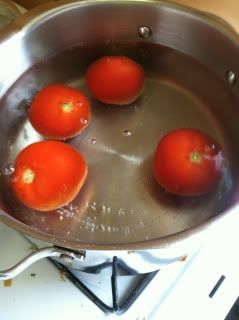
Let them boil for 1 minute. Rinse under cold water.
Photobucket

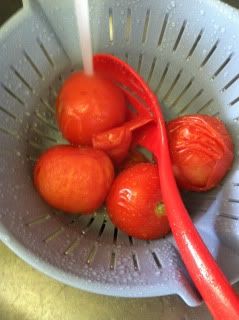
The skins pull right off!
Photobucket

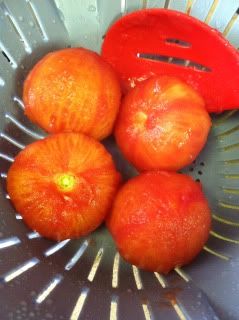
Who knew it was so easy??

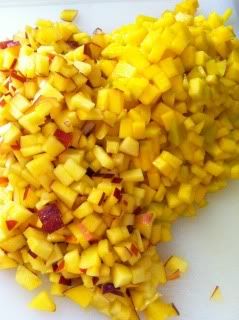
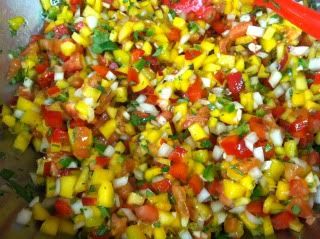
Ok... chop those and put them in a bowl.

Chop mango and nectarines.
Photobucket

That part took me awhile. They're so slippery!! Plus I was watching Ahmed Hassan on Yard Crashers while I was chopping... He's a little... distracting... *swoon*... anyway...

Then I started chopping jalapenos.
Photobucket

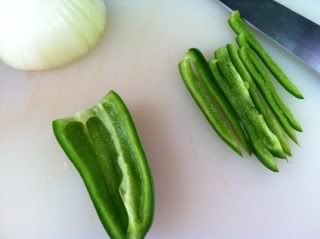
Around that time Jon had missed the last bus to his friend's house. It's not too far away, but it was a gazillion degrees out, so I said I'd give him a ride. (We only have one car, and I needed it later) So I was still in my jammies, no bra... no shoes, my hair probably wasn't brushed. I figured, I'm just running down the street, I'll be right back... no one will see me.

We jump in the car... I drop him off... I'm just pulling away from his friend's house and I wiped my eye with the tip of my finger.

See the pic above?

It doesn't look ominous does it?

Well let me tell ya, instant BLINDING searing pain in my eye... Did I mention I was driving??

Both eyes slammed shut!

So I was trying to pull over... I knew there were cars parked beside me and I was vaguely aware of a few pedestrians.

I very slowly creeped the car over to the right and was able to get out of the street without hitting anything or anyone.

I was in my car, bent over the steering wheel, swearing, eyes burning and running, barely able to open them, hair a mess, in my jammies, no bra, no shoes, and I hear a tap at my window.

I kinda squint in that direction, because I'm still only barely able to open my untouched eye a little bit and roll down the window.

There was a guy there and he said, "My wife noticed you had a really hard time pulling over and she wanted to make sure you're ok"

I told him I was fine, just stupid and that I had just rubbed fresh jalapeno juice into my eye.

He chuckled a bit. I thanked him for checking on me and he went about his day.

It took me a few more minutes before I could actually see enough to drive.

I guess it's a good thing I wasn't on a highway!

So... let this be a lesson to you.

If you're cutting hot peppers, WASH YOUR HANDS... then wash them again!!!

Or wear gloves.

Thank you for checking on me kind strangers!!

Ok... back to the salsa.

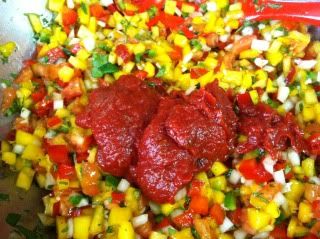
Chop the jalapeno, onion, red pepper, cilantro, and garlic and add them to the tomatoes, mango and nectarines.
Photobucket

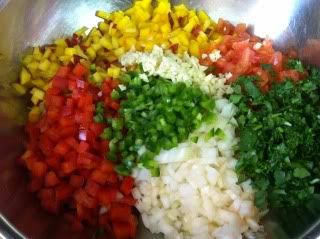
Gently stir until mixed well.
Photobucket

In a separate small bowl whisk together, tomato paste, apple cider vinegar, lemon juice, sugar, oregano, salt and pepper.
PhotobucketPhotobucket

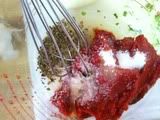
Add the sauce mixture to the fruit/veggie mixture
Photobucket

Stir gently until well combined.
Photobucket

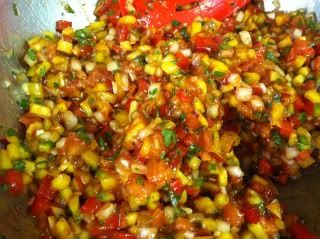
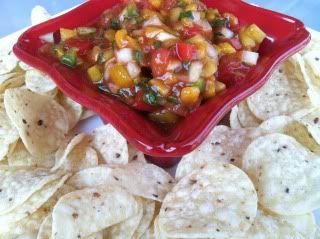
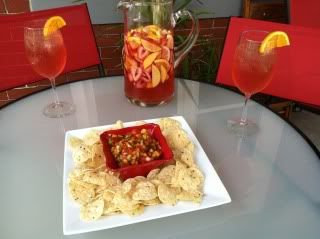
Now it's ready to serve with tortilla chips!
Photobucket

We enjoyed this on the porch with some Peachy White Zinfandel Sangria... stay tuned for that recipe!!
Photobucket

It's a very flavorful salsa, sweet, a little spicy, a bit of crunch from the onions & peppers, yummy cilantro. Definitely a winner... well... unless like Jon, you don't care for cilantro. But I LOVE this! And I'm happy that my search for nectarine (peach) mango salsa has ended.

This makes a huge batch of salsa! So invite over a bunch of friends. Or put some in pretty jars to give to your neighbors. But it also keeps well in the fridge for a few days, so you can keep it all for yourself too!

Wednesday, June 27, 2012

Sweet Ham & Swiss Sliders

If you frequent food blogs, I'm sure you've seen these a gazillion times. I was thinking... hmmm... should I even post these?? But then I thought... a lot of my family and friends who don't frequent food blogs might enjoy them and not have heard of them at all.

So if you've seen a hundred versions of this, here's one more... or I'm sure it's probably almost exactly the same as tons of them. You'll have to keep reading to find out.

If you haven't seen them. Check them out!! They're pretty tasty!

Photobucket

Ham & Swiss Sliders
24 King's Hawaiian Sweet Rolls, sliced in half (2 packages)
24 slices of smokey ham
12 slices of swiss cheese
1/4 C mayo
1 1/2 TBLS Dijon mustard
8 TBLS butter
1 tsp onion powder
1 tsp worcestershire sauce
1/4 C brown sugar

Line a baking sheet with non-stick foil.

Place the bottom half of rolls on the baking sheet and spread each with some mayo.
Fold one slice of ham to fit on each roll.
Then add half a slice of swiss to each.
Top with roll tops.
In a sauce pan, melt butter, Dijon, onion powder, worcestershire sauce and brown sugar.
Pour butter mixture evenly over buns.
Loosely cover with foil and refrigerate 2 - 4 hours or overnight.
Bake at 350F, covered for 10 minutes. Uncover and bake 5 or 10 more minutes until tops are golden and cheese is melty.

~~~~~~~~~~~~~~~~~~~~~~~~~~~~~~~~~~

Assemble sliders.
Photobucket
Photobucket

Pour sweet buttery sauce over them.
Photobucket

Bake at 350F, covered for 10 minutes. Uncover and bake 5 or 10 more minutes until tops are golden and cheese is melty.
Photobucket

When I first saw these I instantly wanted them. I couldn't stop thinking about them until I actually made them.

These were really tasty! Everyone liked them. I even liked the leftovers cold the next day. Jon wasn't a huge fan of the cold leftovers. He thought the butter sauce was too greasy. Plus he's not a such a fan of cold ham sandwiches in general.

Anyway. These were tasty! Give them a try!